
ASM能够做什么
ASM is an all-purpose(多用途的;通用的) Java ByteCode manipulation and analysis framework. It can be used to modify existing classes or to dynamically generate classes, directly in binary form.
The goal of the ASM library is to generate, transform and analyze compiled Java classes, represented as byte arrays (as they are stored on disk and loaded in the Java Virtual Machine).
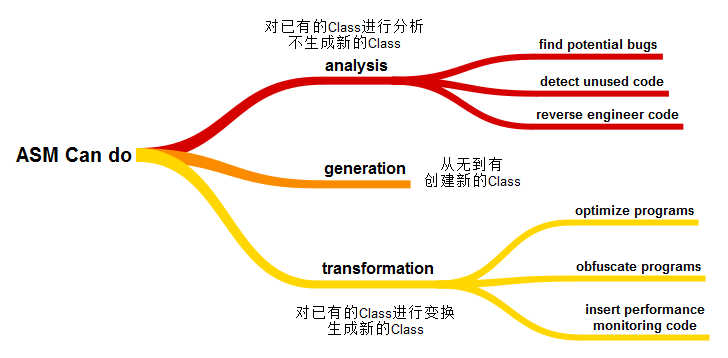
- Program analysis, which can range from a simple syntactic parsing to a full semantic analysis, can be used to find potential bugs in applications, to detect unused code, to reverse engineer code, etc.
- Program generation is used in compilers. This includes traditional compilers, but also stub or skeleton compilers used for distributed programming, Just in Time compilers, etc.
- Program transformation can be used to optimize or obfuscate programs, to insert debugging or performance monitoring code into applications, for aspect oriented programming, etc.
总结:无论是Core API,还是Tree API,都可以用来进行Class Generation、Class Transformation和Class Analysis操作。
Core API和Tree API的区别
整体认识
首先,我们借用电影的片段来解释Core API和Tree API之间的区别,让大家有一个整体的、模糊的认识。
电影《龙门飞甲》雨化田介绍“东厂”和“西厂”的概念:
一句话,东厂管得了的我要管,东厂管不了的我更要管,先斩后奏,皇权特许,这就是西厂,够不够清楚。
我们镜像上面这句话,说明一下“Core API”和“Tree API”的区别:
一句话,Core API做得了的我要做,Core API做不了的我更要做,简单易用,功能更强,这就是Tree API,够不够清楚。
总结一下:
- Tree API的优势:
- 易用性:如果一个人在之前并没有接触过Core API和Tree API,那么Tree API更容易入手。
- 功能性:在实现比较复杂的功能时,Tree API比Core API更容易实现。
- Core API的优势:
- 执行效率:在实现相同功能的前提下,Core API要比Tree API执行效率高,花费时间少。
- 内存使用:Core API比Tree API占用的内存空间少。
ASM provides both APIs because there is no best API. Indeed each API has its own advantages and drawbacks:
- The Core API is faster and requires less memory than the Tree API, since there is no need to create and store in memory a tree of objects representing the class.
- However implementing class transformations can be more diffcult with the Core API, since only one element of the class is available at any given time (the element that corresponds to the current event), while the whole class is available in memory with the Tree API.
再接下来,我们就从技术的细节角度来看Core API和Tree API之间的区别。
Class Generation
假如我们想生成下面一个HelloWorld类:
public interface HelloWorld extends Cloneable {
    int LESS = -1;
    int EQUAL = 0;
    int GREATER = 1;
    int compareTo(Object o);
}
接下来,我们分别使用Core API和Tree API来生成这个类。
如果使用Core API来进行生成,在代码中调用多个visitXxx()方法,相应的代码如下:
public class HelloWorldGenerateCore {
    public static byte[] dump() throws Exception {
        // (1) 创建ClassWriter对象
        ClassWriter cw = new ClassWriter(ClassWriter.COMPUTE_FRAMES);

        // (2) 调用visitXxx()方法
        cw.visit(V1_8, ACC_PUBLIC + ACC_ABSTRACT + ACC_INTERFACE, "sample/HelloWorld",
                null, "java/lang/Object", new String[]{"java/lang/Cloneable"});

        {
            FieldVisitor fv1 = cw.visitField(ACC_PUBLIC + ACC_FINAL + ACC_STATIC, "LESS", "I", null, -1);
            fv1.visitEnd();
        }

        {
            FieldVisitor fv2 = cw.visitField(ACC_PUBLIC + ACC_FINAL + ACC_STATIC, "EQUAL", "I", null, 0);
            fv2.visitEnd();
        }

        {
            FieldVisitor fv3 = cw.visitField(ACC_PUBLIC + ACC_FINAL + ACC_STATIC, "GREATER", "I", null, 1);
            fv3.visitEnd();
        }

        {
            MethodVisitor mv1 = cw.visitMethod(ACC_PUBLIC + ACC_ABSTRACT, "compareTo", "(Ljava/lang/Object;)I", null, null);
            mv1.visitEnd();
        }


        cw.visitEnd();

        // (3) 调用toByteArray()方法
        return cw.toByteArray();
    }
}
如果使用Tree API来进行生成,其特点是代码实现过程就是为ClassNode类的字段进行赋值的过程,相应的代码如下:
public class HelloWorldGenerateTree {
    public static byte[] dump() throws Exception {
        // (1) 使用ClassNode类收集数据
        ClassNode cn = new ClassNode();
        cn.version = V1_8;
        cn.access = ACC_PUBLIC | ACC_ABSTRACT | ACC_INTERFACE;
        cn.name = "sample/HelloWorld";
        cn.signature = null;
        cn.superName = "java/lang/Object";
        cn.interfaces.add("java/lang/Cloneable");

        {
            FieldNode fieldNode = new FieldNode(ACC_PUBLIC | ACC_FINAL | ACC_STATIC, "LESS", "I", null, new Integer(-1));
            cn.fields.add(fieldNode);
        }

        {
            FieldNode fieldNode = new FieldNode(ACC_PUBLIC | ACC_FINAL | ACC_STATIC, "EQUAL", "I", null, new Integer(0));
            cn.fields.add(fieldNode);
        }

        {
            FieldNode fieldNode = new FieldNode(ACC_PUBLIC | ACC_FINAL | ACC_STATIC, "GREATER", "I", null, new Integer(1));
            cn.fields.add(fieldNode);
        }

        {
            MethodNode methodNode = new MethodNode(ACC_PUBLIC | ACC_ABSTRACT, "compareTo", "(Ljava/lang/Object;)I", null, null);
            cn.methods.add(methodNode);
        }

        // (2) 使用ClassWriter类生成字节码
        ClassWriter cw = new ClassWriter(ClassWriter.COMPUTE_FRAMES);
        cn.accept(cw);
        return cw.toByteArray();
    }
}
虽然Core API和Tree API在代码的表现形式上有差异,前者是调用visitXxx()方法,后者是给ClassNode定义的字段赋值,但是它们所需要的信息是一致的,都需要提供类名、父类名、接口名、字段、方法等信息。
Generating a class with the tree API simply consists in creating a ClassNode object and in initializing its fields.
Using the tree API to generate a class takes about 30% more time and consumes more memory than using the core API. But it makes it possible to generate the class elements in any order, which can be convenient in some cases.
Class Transformation
Like for class generation, using the tree API to transform classes takes more time and consumes more memory than using the core API. But it makes it possible to implement some transformations more easily.
现在,我们想给下面的HelloWorld类添加一个digital signature信息(这是一个Class Transformation的过程):
public class HelloWorld {
    public static void main(String[] args) {
        System.out.println("Hello ASM");
    }

    public void test() {
        System.out.println("test");
    }
}
这里面涉及到两个问题:
- 第一个问题,如何计算digital signature的信息呢? 我们用一个简单的方法,就是将
class name + field name + method name拼接成一个字符串,然后求这个字符中的hash code,那么这个hash code就作为digital signature。大家可以根据自己的需求,来换成一个更复杂的方法。 - 第二个问题,如何将计算出的digital signature添加到
HelloWorld类里面去? 我们通过一个自定义的Attribute来添加。
其实,这个例子来自于asm4-guide.pdf文件,我们稍稍做了一些修改:原文是添加一个Annotation,现在是添加一个Attribute。
This is the case, for example, of a transformation that adds to a class an annotation containing a digital signature of its content. With the core API the digital signature can be computed only when all the class has been visited, but then it is too late to add an annotation containing it, because annotations must be visited before class members. With the tree API this problem disappears because there is no such constraint in this case.
In fact, it is possible to implement the AddDigitialSignature example with the core API,
but then the class must be transformed in two passes.
- During the first pass the class is visited with a
ClassReader(and noClassWriter), in order to compute the digital signature based on the class content. - During the second pass the same
ClassReaderis reused to do a second visit of the class, this time with anAddAnnotationAdapterchained to aClassWriter.
那么,我们先来使用Core API来进行实现。
我们添加一个ClassGetAttributeContentVisitor类,它用来获取digital signature的内容:
public class ClassGetAttributeContentVisitor extends ClassVisitor {
    private final StringBuilder attr = new StringBuilder();

    public ClassGetAttributeContentVisitor(int api, ClassVisitor classVisitor) {
        super(api, classVisitor);
    }

    @Override
    public void visit(int version, int access, String name, String signature, String superName, String[] interfaces) {
        attr.append(name);
        super.visit(version, access, name, signature, superName, interfaces);
    }

    @Override
    public FieldVisitor visitField(int access, String name, String descriptor, String signature, Object value) {
        attr.append(name);
        return super.visitField(access, name, descriptor, signature, value);
    }

    @Override
    public MethodVisitor visitMethod(int access, String name, String descriptor, String signature, String[] exceptions) {
        attr.append(name);
        return super.visitMethod(access, name, descriptor, signature, exceptions);
    }

    public String getAttributeContent() {
        return attr.toString();
    }
}
接着,我们添加一个ClassAddCustomAttributeVisitor类,它用来添加自定义的Attribute:
public class ClassAddCustomAttributeVisitor extends ClassVisitor {
    private final String attrName;
    private final String attrContent;
    private boolean isAttrPresent;

    public ClassAddCustomAttributeVisitor(int api, ClassVisitor classVisitor, String attrName, String attrContent) {
        super(api, classVisitor);
        this.attrName = attrName;
        this.attrContent = attrContent;
        this.isAttrPresent = false;
    }

    @Override
    public void visitAttribute(Attribute attribute) {
        if (attribute.type.equals(attrName)) {
            isAttrPresent = true;
        }
        super.visitAttribute(attribute);
    }

    @Override
    public void visitNestMember(String nestMember) {
        addAttribute();
        super.visitNestMember(nestMember);
    }

    @Override
    public void visitInnerClass(String name, String outerName, String innerName, int access) {
        addAttribute();
        super.visitInnerClass(name, outerName, innerName, access);
    }

    @Override
    public RecordComponentVisitor visitRecordComponent(String name, String descriptor, String signature) {
        addAttribute();
        return super.visitRecordComponent(name, descriptor, signature);
    }

    @Override
    public FieldVisitor visitField(int access, String name, String descriptor, String signature, Object value) {
        addAttribute();
        return super.visitField(access, name, descriptor, signature, value);
    }

    @Override
    public MethodVisitor visitMethod(int access, String name, String descriptor, String signature, String[] exceptions) {
        addAttribute();
        return super.visitMethod(access, name, descriptor, signature, exceptions);
    }

    @Override
    public void visitEnd() {
        addAttribute();
        super.visitEnd();
    }

    private void addAttribute() {
        if (!isAttrPresent) {
            int hashCode = attrContent.hashCode();
            byte[] info = ByteUtils.intToByteArray(hashCode);
            Attribute attr = new CustomAttribute(attrName, info);
            super.visitAttribute(attr);
            isAttrPresent = true;
        }
    }
}
再接着,我们经过两次处理来完成转换:
public class HelloWorldTransformCore {
    public static void main(String[] args) {
        String relative_path = "sample/HelloWorld.class";
        String filepath = FileUtils.getFilePath(relative_path);
        byte[] bytes1 = FileUtils.readBytes(filepath);

        //(1)构建ClassReader
        ClassReader cr = new ClassReader(bytes1);

        //(2)构建ClassWriter
        ClassWriter cw = new ClassWriter(ClassWriter.COMPUTE_FRAMES);

        int api = Opcodes.ASM9;
        int parsingOptions = ClassReader.SKIP_DEBUG | ClassReader.SKIP_FRAMES;

        //(3)第一次处理
        ClassGetAttributeContentVisitor cv1 = new ClassGetAttributeContentVisitor(api, null);
        cr.accept(cv1, parsingOptions);
        String attributeContent = cv1.getAttributeContent();

        //(4)第二次处理
        ClassVisitor cv2 = new ClassAddCustomAttributeVisitor(api, cw, "cn.lsieun.MyAttribute", attributeContent);
        cr.accept(cv2, parsingOptions);

        //(5)生成byte[]
        byte[] bytes2 = cw.toByteArray();

        FileUtils.writeBytes(filepath, bytes2);
    }
}
再接下来,我们看看如何使用Tree API来进行转换。
public class ClassAddCustomAttributeNode extends ClassNode {
    private final String attrName;

    public ClassAddCustomAttributeNode(int api, ClassVisitor cv, String attrName) {
        super(api);
        this.cv = cv;
        this.attrName = attrName;
    }

    @Override
    public void visitEnd() {
        // 首先,处理自己的代码逻辑
        StringBuilder sb = new StringBuilder();
        sb.append(name);
        for (FieldNode fn : fields) {
            sb.append(fn.name);
        }
        for (MethodNode mn : methods) {
            sb.append(mn.name);
        }
        int hashCode = sb.toString().hashCode();
        byte[] info = ByteUtils.intToByteArray(hashCode);
        Attribute customAttribute = new CustomAttribute(attrName, info);
        if (attrs == null) {
            attrs = new ArrayList<>();
        }
        attrs.add(customAttribute);

        // 其次,调用父类的方法实现(根据实际情况,选择保留,或删除)
        super.visitEnd();

        // 最后,向后续ClassVisitor传递
        if (cv != null) {
            accept(cv);
        }
    }
}
public class HelloWorldTransformTree {
    public static void main(String[] args) {
        String relative_path = "sample/HelloWorld.class";
        String filepath = FileUtils.getFilePath(relative_path);
        byte[] bytes1 = FileUtils.readBytes(filepath);

        // (1)构建ClassReader
        ClassReader cr = new ClassReader(bytes1);

        // (2)构建ClassWriter
        ClassWriter cw = new ClassWriter(ClassWriter.COMPUTE_FRAMES);

        // (3)串连ClassNode
        int api = Opcodes.ASM9;
        ClassNode cn = new ClassAddCustomAttributeNode(api, cw, "cn.lsieun.MyAttribute");

        //(4)结合ClassReader和ClassNode
        int parsingOptions = ClassReader.SKIP_DEBUG | ClassReader.SKIP_FRAMES;
        cr.accept(cn, parsingOptions);

        // (5) 生成byte[]
        byte[] bytes2 = cw.toByteArray();

        FileUtils.writeBytes(filepath, bytes2);
    }
}
By generalizing this argument we see that, in fact,
any transformation can be implemented with the core API alone, by using several passes if necessary.
But this increases the transformation code complexity,
this requires to store state between passes (which can be as complex as a full tree representation!),
and parsing the class several times has a cost,
which must be compared to the cost of constructing the corresponding ClassNode.
The conclusion is that the tree API is generally used for transformations that cannot be implemented in one pass with the core API. But there are of course exceptions. For example an obfuscator cannot be implemented in one pass, because you cannot transform classes before the mapping from original to obfuscated names is fully constructed, which requires to parse all classes. But the tree API is not a good solution either, because it would require keeping in memory the object representation of all the classes to obfuscate. In this case it is better to use the core API with two passes: one to compute the mapping between original and obfuscated names (a simple hash table that requires much less memory than a full object representation of all the classes), and one to transform the classes based on this mapping.
总结
本文内容总结如下:
- 第一点,在ASM当中,不管是Core API,还是Tree API,都能够进行Class Generation、Class Transformation和Class Analysis操作。
- 第二点,Core API和Tree API是两者有各自的优势。Tree API易于使用、更容易实现复杂的操作;Core API执行速度更快、占用内存空间更少。